All Categories
Featured
Table of Contents
- – Rv Roof Repair Anaheim, CA
- – OCRV Center
- – Roof Repair For Rv Anaheim, CA
- – Rubber Roof Installation Anaheim, CA
- – Rv Rubber Roof Replacement Cost Anaheim, CA
- – Rv Roof Repair Anaheim, CA
- – Replace Rv Roof Anaheim, CA
- – Epdm Rv Roof Repair Anaheim, CA
- – Rubber Roof Installation Anaheim, CA
- – Class C Rv Roof Repair Anaheim, CA
- – OCRV Center
Rv Roof Repair Anaheim, CA
In this blog post, we want to share with you just how to DIY RV roofing repair work. Understanding how to DIY a whole lot of the things that can break or mess up will certainly save you not just a great deal of money on RV repair work however might additionally conserve you a lot of prospective time in the store!
I might get a small commission when you purchase using my web link. We try to prepare our paths carefully to prevent low-hanging objects over the road. Occasionally though, we locate ourselves in unexpected circumstances. This is exactly how we ended up with a few little rips on the roofing system of our motor home.
Roof Repair For Rv Anaheim, CA
We assumed we were free from the branches, however we ended up capturing a few of them on the much left side of the roofing. There were a total of 4-5 little holes in the side of the roof covering. We really did not check the roof covering since we didn't assume we hit anything.
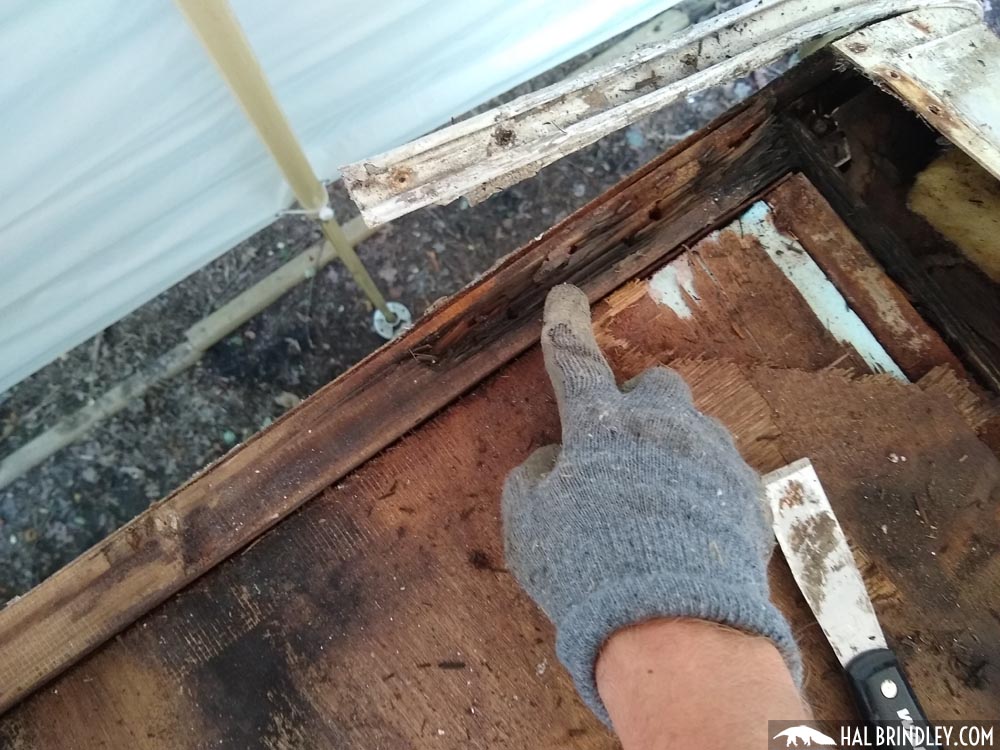
Throughout the storm, we discovered that we had a percentage of water dripping with one of the light components in the restroom. Luckily we did not end up with any type of long-term water damages. After the storm, Tucker increased on the roofing and that is when he found the holes.
Rubber Roof Installation Anaheim, CA
You'll want to cleanse the location around the tear that you will be patching well. To clean the roofing, make use of scrubing alcohol and either a dustcloth or paper towels.

, which is a Recreational vehicle roof covering fixing tape. Eternabond makes the ideal RV roofing tapes and is an excellent item to have on hand for the emergency repair service of a leaky roofing system.
Rv Rubber Roof Replacement Cost Anaheim, CA
Remove the backing and apply meticulously over the tear in the roof. Once it has touched the roof it sticks rather promptly so you'll desire to make certain and setting it right the initial time.
This rubber sealer produces a protected secondary seal on your rubber roofing and guarantees that the leakage is appropriately sealed. This is likely the very same sealer that was utilized on your recreational vehicle roofing to seal around the roof vents, a/c, etc. There are a great deal of Dicor recreational vehicle roof covering repair products that you can buy including roof finishes, roofing sealant, and extra for the surface area of your roof covering.
If the damages is on the edge of your camper roof like ours was, you might have some Dicor that runs down the side. Clean any type of excess off and don't enable it to diminish as well far. This is a self-leveling sealant so you need to wind up with a fairly level patch.
Rv Roof Repair Anaheim, CA
Over time, it will entirely harden and you won't have to stress concerning it anymore. After the Dicor lap sealant was applied If the leak in your RV roof is a little area, the ideal way to repair it is to follow our step-by-step guide and fix the broken area yourself to take care of the tiny leakage
A basic recreational vehicle roofing system repair work, as we did on our fixing job, is reasonably low-cost and should set you back less than $50 for do it yourself motor home owners. To replace a whole RV roof with considerable damages would cause far more expensive repair services. I really hope that you have found the details in this article valuable.
Replace Rv Roof Anaheim, CA
This will certainly give you comfort and verify that your roofing system remains in excellent shape. Exactly how to Do It Yourself Your Motor Home Roof Covering Repair.
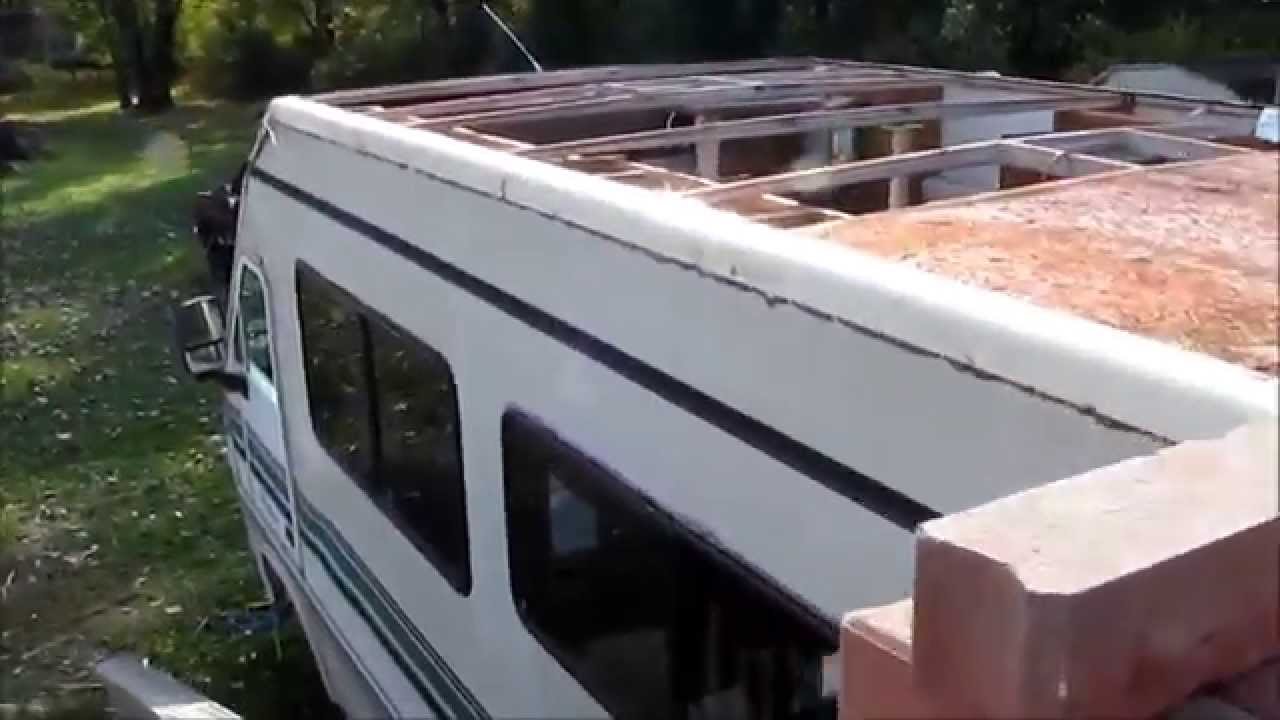
If you don't inspect, reseal, and fix your RV roofing system regularly, you will certainly end up with some beautiful awful water damage. This is something that will quickly reduce the value of your motor home and can even render it unusable. Taking care of your Recreational vehicle roofing system is something you can possibly do all on your own.
After about 10 years, it will certainly also be needed to reseal the entire roofing system. To do this, you'll require to climb onto the roof, yet be extremely mindful when you do. Are you sure it's strong sufficient to support you? Exists a ladder at the back? Otherwise, it more than likely isn't strong sufficient to be strolled on.
Next, you'll wish to cleanse your roofing system extensively, so as to remove any dust fragments. You can use a lengthy handled brush for this, however never make use of a cleaner which contains oil solvents or citrus ingredients on your rubber or vinyl roofing. These sorts of cleaners will cause irreversible damage to the surface area.
Epdm Rv Roof Repair Anaheim, CA
While you're cleansing, scuff off any debris or old roofing system material, but be cautious while you do this as you could easily extend a tear, or perhaps punch a hole with the roofing. You should then dry the roofing system as best as you can. Note: Rubber recreational vehicle roofings can be extremely unsafe when damp.
After the roof is tidy, you are going to want to check the seams for holes, cracks or peeling off, so you can reseal wherever needed. You'll want to make a factor of resealing all seams as soon as a year whether or not they show indications of wear.
Rubber Roof Installation Anaheim, CA
When it comes to choosing the ideal Recreational vehicle roofing sealer, you'll want to take into consideration whether you are repairing a tear, resealing a joint, or securing the whole roof covering. It can be utilized for area securing or to reseal every seam on the RV roofing. Just clean up the location well and apply with a caulk gun.
Class C Rv Roof Repair Anaheim, CA
Similar to the EPDM system listed above, this layer product will cover your TPO roofing system and assist it last one more 10 years. Before EPDM and TPO, steel was the material of choice for Recreational vehicle roofing systems.
The aforementioned EternaBond is still king when it comes to repairing little damages on a metal roof covering. Recreational vehicle steel roofing systems do need to be absolutely resealed from time to time.
Rv Roof Replacement Anaheim, CARv Rubber Roof Maintenance Anaheim, CA
Repair Rv Roof Anaheim, CA
Roof Repair For Rv Anaheim, CA
Rv Roof Repair Anaheim, CA
Rubber Roof For Camper Anaheim, CA
Rv Slide Out Roof Repair Anaheim, CA
Rv Rubber Roof Repair Anaheim, CA
Rv Trailer Rubber Roof Repair Anaheim, CA
Rubber Roof For Camper Anaheim, CA
Rv Roof Repair Fiberglass Anaheim, CA
Roof Repair For Rv Anaheim, CA
Motorhome Roof Replacement Anaheim, CA
Epdm Rv Roof Repair Anaheim, CA
Best Rv Roof Repair Anaheim, CA
Epdm Rv Roof Repair Anaheim, CA
Best Rv Roof Repair Anaheim, CA
Rv Roof Repair Near Me Anaheim, CA
Rv Rubber Roof Repair Anaheim, CA
Rubber Roof For Camper Anaheim, CA
Class C Rv Roof Repair Anaheim, CA
Repair Rv Roof Anaheim, CA
Rv Roof Repair Near Me Anaheim, CA
Rv Roof Repair Fiberglass Anaheim, CA
Roof Repair For Rv Anaheim, CA
Rv Roof Replacement Anaheim, CA
Class C Rv Roof Repair Anaheim, CA
Rv Roof Repair Anaheim, CA
Rv Roof Replacement Anaheim, CA
Best Rv Roof Repair Anaheim, CA
Rv Rubber Roof Replacement Anaheim, CA
Rv Roof Repair Fiberglass Anaheim, CA
Rv Rubber Roof Replacement Cost Anaheim, CA
Rv Roof Maintenance Anaheim, CA
Rv Roof Repair Fiberglass Anaheim, CA
Rv Rubber Roof Replacement Cost Anaheim, CA
Rv Roof Maintenance Anaheim, CA
Rv Roof Leak Repair Near Me Anaheim, CA
Repair Rv Roof Anaheim, CA
Rv Rubber Roof Repair Anaheim, CA
Rubber Roof Installation Anaheim, CA
Replace Rv Roof Anaheim, CA
Rv Trailer Roof Repair Anaheim, CA
Rv Roof Leak Repair Anaheim, CA
Resealing Rv Roof Anaheim, CA
Rv Roof Repair Anaheim, CA
Replace Rv Roof Anaheim, CA
Rv Roof Repair Near Me Anaheim, CA
Rubber Roof For Camper Anaheim, CA
Repair Rv Roof Leak Anaheim, CA
Rv Roof Repair Near Me Anaheim, CA
Rv Roof Repair Fiberglass Anaheim, CA
Rubber Roofing For Campers Anaheim, CA
Rv Trailer Rubber Roof Repair Anaheim, CA
Best Rv Roof Repair Anaheim, CA
Rv Rubber Roof Maintenance Anaheim, CA
Class C Rv Roof Repair Anaheim, CA
Rv Trailer Roof Repair Anaheim, CA
Best Rv Roof Repair Anaheim, CA
Rv Roof Repair Fiberglass Anaheim, CA
Rv Rubber Roof Repair Anaheim, CA
Rv Roof Repair Fiberglass Anaheim, CA
Rubber Roof Installation Anaheim, CA
Rv Fiberglass Roof Repair Anaheim, CA
Roof Repair For Rv Anaheim, CA
Rv Roof Repair Anaheim, CA
Repair Rv Roof Leak Anaheim, CA
Epdm Rv Roof Repair Anaheim, CA
Rubber Roofing For Rv Anaheim, CA
Resealing Rv Roof Anaheim, CA
Rv Rubber Roof Replacement Cost Anaheim, CA
Epdm Rv Roof Repair Anaheim, CA
Rubber Roof For Rv Anaheim, CA
Rv Roof Repair Service Near Me Anaheim, CA
Rv Roof Maintenance Anaheim, CA
Motorhome Roof Replacement Anaheim, CA
Best Rv Roof Repair Anaheim, CA
Rubber Roofing For Campers Anaheim, CA
Find A Good Local Seo For Law Firms Anaheim, CA
Finding A Seo Agency Anaheim, CA
OCRV Center
Table of Contents
- – Rv Roof Repair Anaheim, CA
- – OCRV Center
- – Roof Repair For Rv Anaheim, CA
- – Rubber Roof Installation Anaheim, CA
- – Rv Rubber Roof Replacement Cost Anaheim, CA
- – Rv Roof Repair Anaheim, CA
- – Replace Rv Roof Anaheim, CA
- – Epdm Rv Roof Repair Anaheim, CA
- – Rubber Roof Installation Anaheim, CA
- – Class C Rv Roof Repair Anaheim, CA
- – OCRV Center
Latest Posts
Roof Cleaning Services [target:city]
[target:city] Gutter Cleaning Company Near Me
San Dimas Roof Cleaning Company
More
Latest Posts
Roof Cleaning Services [target:city]
[target:city] Gutter Cleaning Company Near Me
San Dimas Roof Cleaning Company