All Categories
Featured
Table of Contents
- – Rv Repair Places Near Me La Habra, CA
- – OCRV Center
- – Rv Repair In My Area La Habra, CA
- – Rv Generator Repair La Habra, CA
- – Motorhome Refrigerator Repair La Habra, CA
- – Rv Floor Repair Near Me La Habra, CA
- – Rv Plumbing Repair Near Me La Habra, CA
- – Camper Ac Repair Near Me La Habra, CA
- – Rv Refrigerator Repair Near Me La Habra, CA
- – Rv Repair In My Area La Habra, CA
- – Rv Repair Service Near Me La Habra, CA
- – Rv Solar Installation La Habra, CA
- – Rv Plumbing Repair Near Me La Habra, CA
- – Motorhome Repair Near Me La Habra, CA
- – Motorhome Service And Repair Near Me La Habr...
- – OCRV Center
Rv Repair Places Near Me La Habra, CA
So next, , let's crawl under a camper. Well, I'm under the camper now, undoubtedly, and you can see over there, I have actually currently obtained a couple of battens in location and an additional one below. What I'm doing is really feeling through the textile, and after that there's a joist right there.
And after that, brr, brr, must have the ability to just drive some screws. Oh yeah, so it's good. The batten is simply imitating an actually large washing machine to make certain that that material does not have the chance to tear through and come loose. That is definitely going to hold that in area.
The following thing inside below is to look for a factor where we obtain to good product, and after that tie right into that with a new piece in a means that structurally is gon na job. And likewise just is straightforward sufficient to do. Let me obtain some tools drawn with each other, and then we'll look at out with the old and in with the brand-new here.
I have actually got a negative end, conveniently determined, because that wood remained in truly, actually negative form. And after that just looking at the staying lumber below. I'm trying to find a component right here where it gets audio - Rv Repair Places Near Me La Habra. Currently, the other point I know is that beneath below, right there is a steel element of the trailer.
Rv Repair In My Area La Habra, CA
If I had to return even more with the system I'm concerning to utilize here, I would be okay keeping that. If in order to eliminate poor product, I needed to reduce right here where I'm not over a steel frame element, I would do that. What I've done so much lies the steel.
And the following point, allow's get that negative place reduced out. That went well. And I've already got a new piece cut.
There we go. And below's the point. The secret to this are pieces of scrap plywood. And the method this is gon na job is we're gon na bridge that seam with those plywood scraps. Plywood is exceptionally solid stuff. And coupled with the plywood, we're mosting likely to include adhesive and screws, and that is truly gon na make this primarily similar to having one lengthy piece once again when we're done.
Rv Generator Repair La Habra, CA
The last thing we want is for the plywood to finish up standing happy with the two-by product. After that bridge that seam concerning uniformly. I have actually got in my warm little hands, another item to go on that side. I just have to obtain my platform out of the way here.
And when this is done, that is gon na be a really, really strong system. The last item of plywood is concerning to obtain placed in, yet allowed's talk about a pair things.
So this is a great application for it. Since of using that, that's part of the reason that I desired to see to it those battens got under the fabric. And the reason being that that mineral wool, it's got some density to it. Currently it's not that sitting there, I'm worried regarding it collapsing, specifically with the battens that I put beneath, however just be observant that if you utilize that it does have some weight to it, and you wan na see to it that that textile under the camper is gon na support that.
When I'm reducing this item, the item that's gon na fill in here, I would such as to maintain the factory edge on that end butting versus the factory edge that's currently in place, and after that the cut side goes out right here up versus the wall surface. Now, if you have to do a trim, you have to do a trim, and in this case I did.
Motorhome Refrigerator Repair La Habra, CA
So if you obtained ta do it, you obtained ta do it, yet it in the perfect globe, factory side to manufacturing facility edge right here on the lengthy seams, and on the short joints where items are meeting. The various other thing is that we intend to be fifty percent on a joist. So what I imply by that is that this piece of plywood is half on this joist, and afterwards the next item of plywood is gon na begin right here, so it's got something to be attached to, which's simply a, you recognize, a building guideline that you always follow when you're doing floor covering or roof.
There aren't any pieces of insulation laying on top of the framing. I have got, if you watch out right here, I have actually obtained these areas noted on the wall, to ensure that as I go along with a screw gun, a lot more on that in a second, I know that sleeper, that joist exists, center is there, center is there.
I need to have an inch and a quarter staple going right into it. I do not have a stapler that'll do that, however I do own a screw gun that I can utilize to drive long screws. So I'm doing this with a screw gun rather than a stapler. All right, a great deal of chatting, and let's take a look at obtaining the plywood ahead in.
Rv Floor Repair Near Me La Habra, CA
Well, we finished with a whole lot of screwing around.The entire floor was a great deal of screwing about. Just a great deal of little fussy points to do to obtain this right, however definitely worth doing, since undoubtedly there were some bad spots in below that needed to go. With those screws, if there's any kind of location where you feel like you may've missed, get a standard cordless screwdriver, back those screws out.
That deals with this flooring task, and it was intriguing, yet I will certainly state, I am pleased it's done.
Just call us and ask about recreational vehicle flooring fixing currently! Personalized Way is a RV repair work store that can quickly and successfully make RV flooring replacement in Costa Mesa.
We have the right devices, understanding, and experience. Plastic is an extremely popular option for recreational vehicle floor covering as a result of its sturdiness and ease of maintenance. It is a waterproof product that is immune to use and tear. Vinyl floor covering is available in a variety of styles and colors. It enables you to choose a look that matches your personal style and the style of your motor home.
Rv Plumbing Repair Near Me La Habra, CA
Not just will it provide the interior of your vehicle a fresh, makeover. It will additionally be much easier to cleanse and preserve contrasted to traditional floor covering products. The 2nd most preferred flooring is carpeting. The product gives a soft, comfy surface area to stroll on. The carpeting is especially good when you're investing extended periods of time in your RV.

It's a good choice for Recreational vehicles that are parked in close proximity to other cars. Carpet can give some insulation, assisting to maintain your RV warm in the winter and cool in the summer season. Looking for recreational vehicle rug installers near me? Custom-made Method provides services in recreational vehicle service center in Costa Mesa and mobile RV services in Orange Region, The Golden State.
Our qualified solution specialists boast over 35 years of recreational vehicle service experience. We understand just how important dedicated, honest, and reliable service is and this is what we satisfaction ourselves on. We provide service that cares, prior to and after the sale: we fix the reason, not just the problem. Utilize the Service Form today to make a visit for every one of your service requirements.
Camper Ac Repair Near Me La Habra, CA
Nonetheless, if you run into this problem, bring it in for a complete examination. We'll collaborate with your insurance policy business, give a quote, assistance solve your issue and obtain you back to outdoor camping. If you have actually ever gone to a recreational vehicle supplier's manufacturing facility and see just how they build Motor homes, you know that electrical systems are made complex.
If you find yourself in a circumstance where your slide-out is not working due to electric or mechanical problems, do not hesitate to call us. We would certainly be delighted to walk you through some troubleshooting tips. If required, come check out us so we can get to the root of the issue. Having fridge troubles in your motor home can be aggravating.
Rv Refrigerator Repair Near Me La Habra, CA
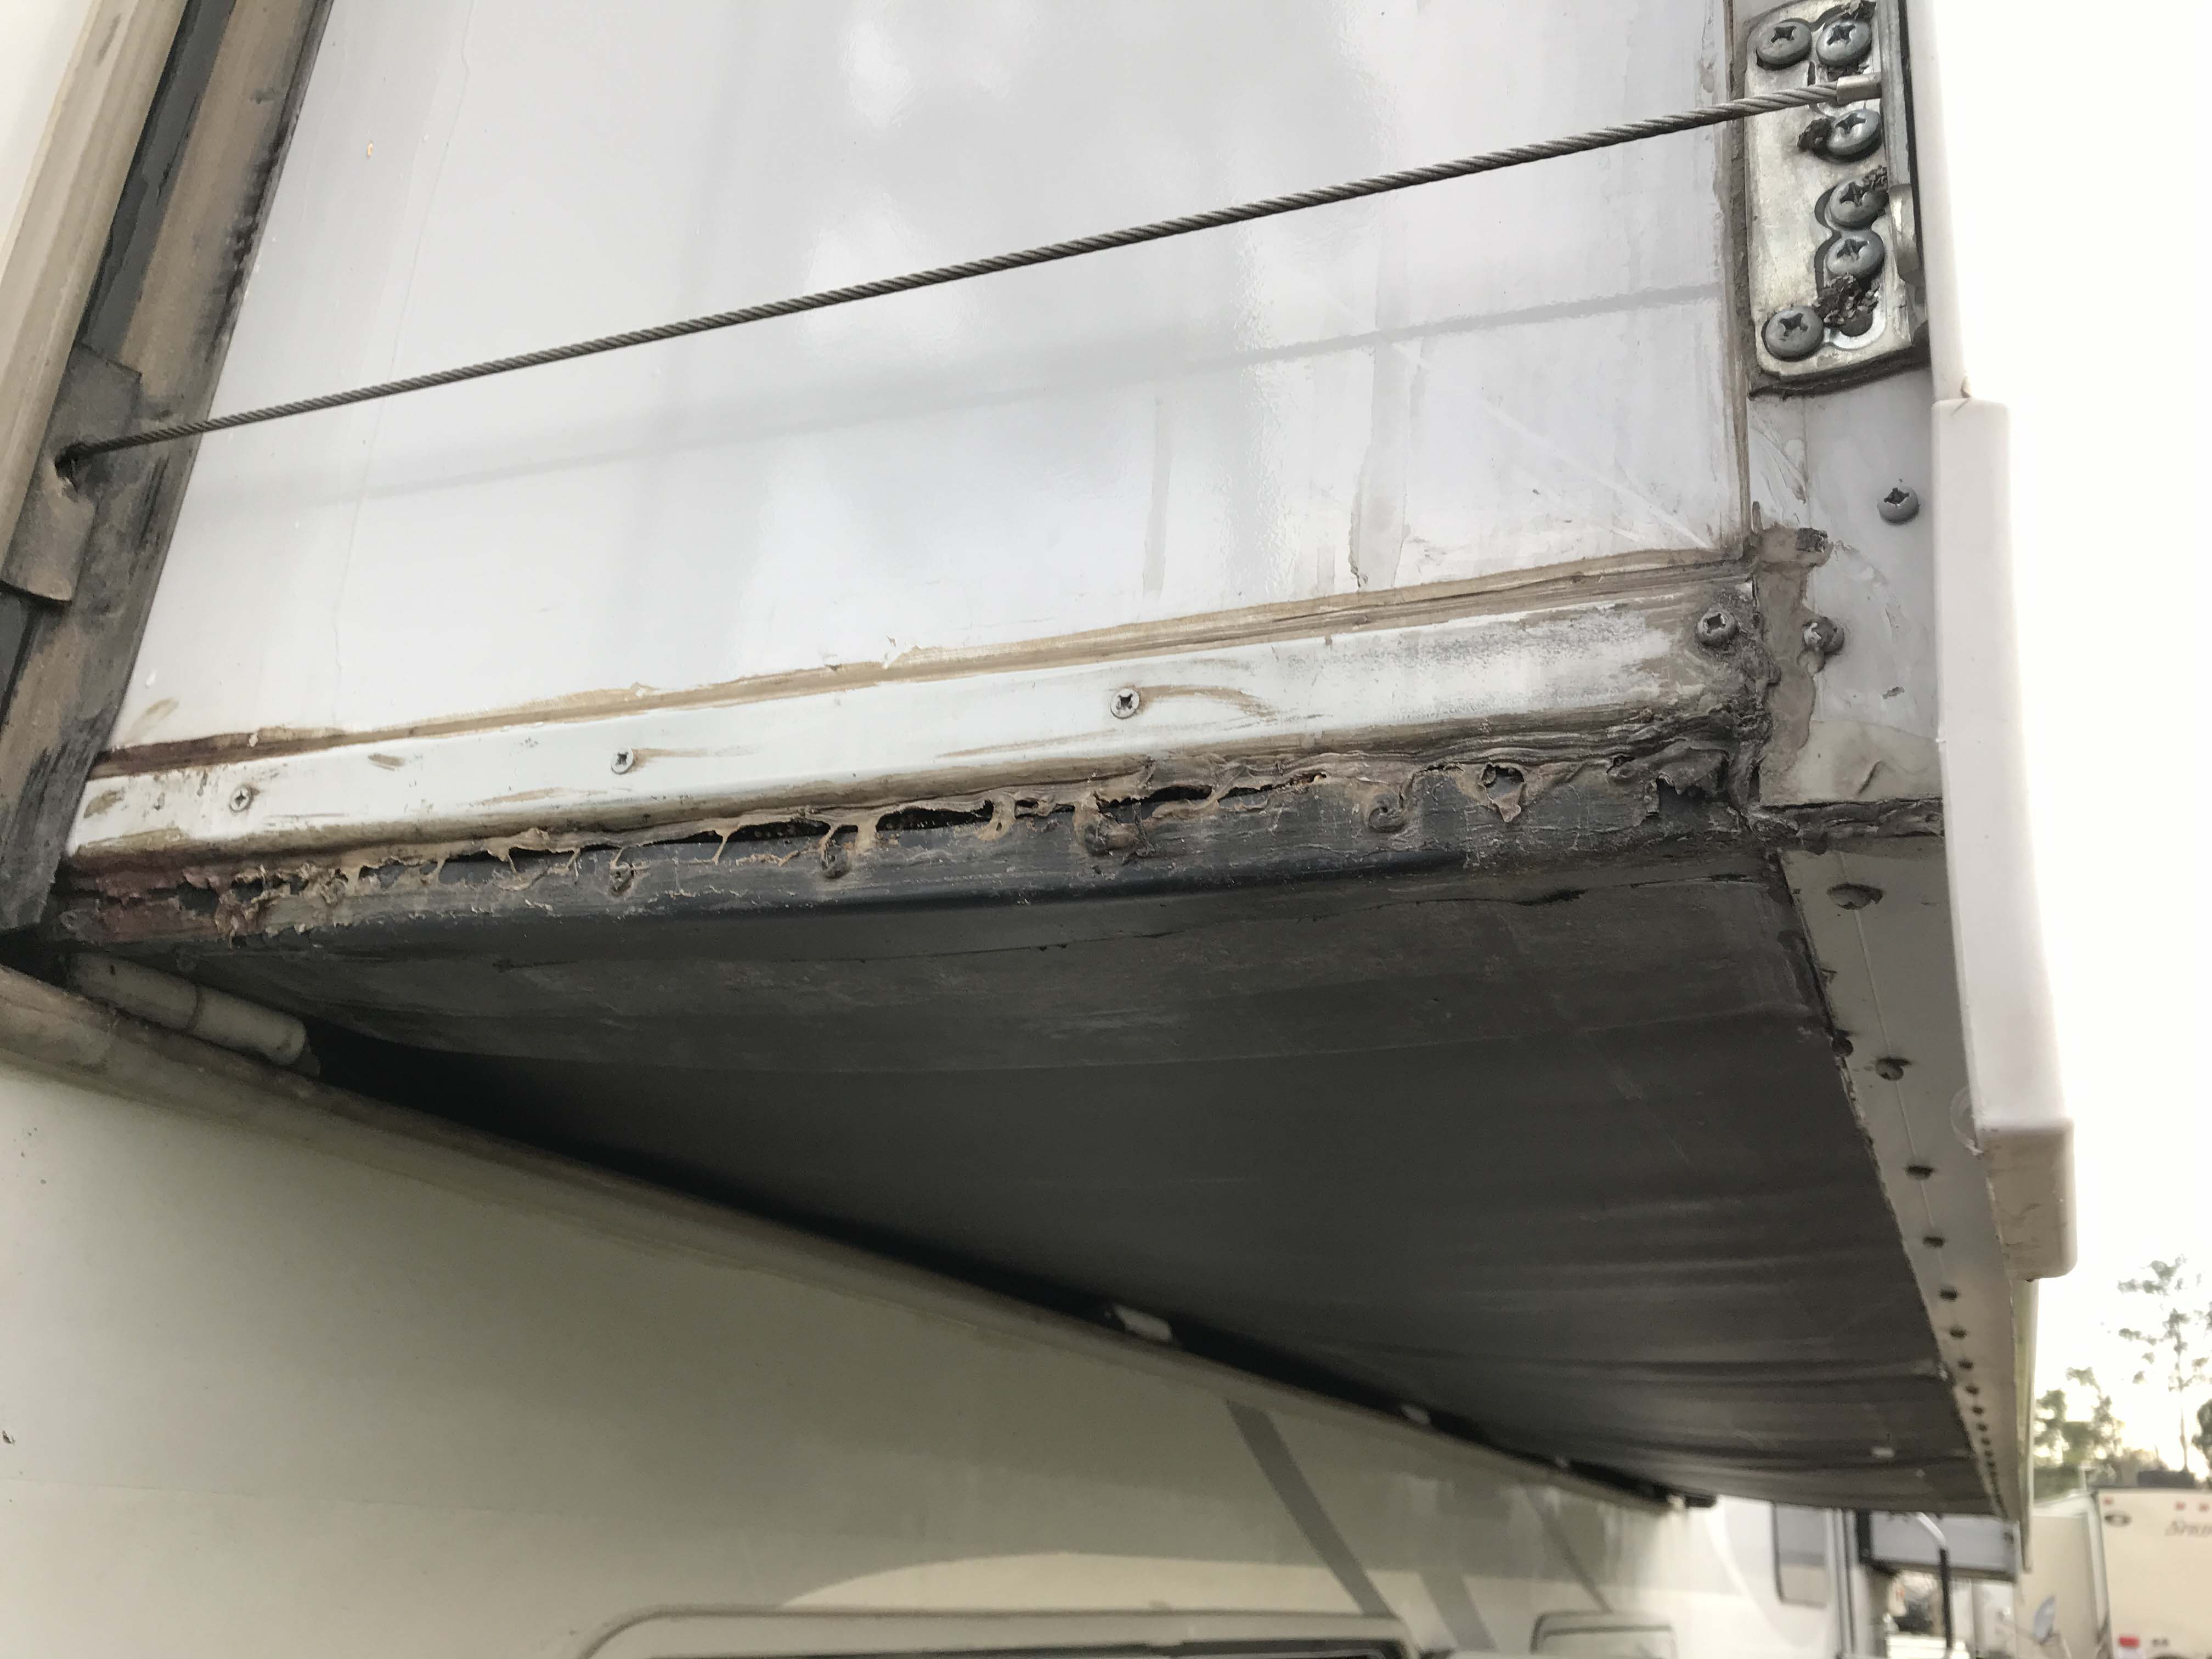
If your refrigerator isn't functioning like it should, come on in to obtain it looked at. Accidents and water leaks happen. Unfortunately, they can do more damage than a basic solution can do! That's where we can assist. Rv Repair Places Near Me La Habra. Not only can we take care of regular stuff like awnings, refrigerators, and slide out however our body store can rebuild entire areas of your unit.
If these is the situation, we deal with the leading awning companies to obtain your motor home awning taken care of. There is nothing even worse than a warm summertime day without any cooling, trust fund our manufacturing facility educated service technicians can have your air conditioner fixed and back on the road with item of mind.
Rv Repair In My Area La Habra, CA
To make a consultation please call one of our three convenient cutting edge freeway friendly places or load out the e-contact type. Home appliance Repair (stove, heating system, refrigerator, AIR CONDITIONING) Awning Repair Service Axle Repair Work/ Upkeep Flooring Fixing Roofing Fixing Aftermarket Add-on Setup Electrical Hitch/ Brake Setup Pipes Propane Body Shop/ Crash Center And so much a lot more.
In Service we have Certified RV Professionals, Master Certified Specialists, Certified Service Writers, and Licensed Solution Managers, one of which has actually been with Little Dealership given that 1975. Little Dealership Little Rates Motor home is a certified member of the Better Company Bureau with an A+ rating, the highest available.
Rv Repair Service Near Me La Habra, CA
We service and repair work most significant elements including LP Gas, electrical and plumbing components. We are a totally certified and guaranteed repair work shop accepting insurance policy and guarantee claims. Concern the Northern Virginia recreational vehicle expert. We make use of the ideal top quality replacement parts to get you back when traveling safely and in style.
provides preventative maintenance for course A and C motorhomes. Count on our skilled professionals to take care of any kind of internal or exterior system. Camp Ground Mobile Home Park Dealership (Pre-purchase Examination) On the Side of the Road Anywhere You May Be Within Our Service Location is an additional of our specialties. Absolutely nothing is even worse than getting on vacation and experiencing a malfunction.
Our goal is to supply the best Motor home services available at budget-friendly prices. Delighted to reveal we currently supply Motor home sales & consignment.
Rv Solar Installation La Habra, CA
I will utilize Recreational vehicle Fixing Bear once more. They took the Motor home right in and serviced everything while I waited as guaranteed.
Rates was reasonable and as estimated. I will definitely be back for servicing in the future. Center of wintertime. Snowy conditions. The heater in my old Toyota motorhome quit on me. Not just did they make time within 2 days to take a look at it and detect it, transforms out they had the old board in stock! Dealt with in four hours.
If these is the case, we collaborate with the leading awning firms to get your RV awning repaired. There is absolutely nothing even worse than a hot summer day without any air conditioning, trust our factory educated specialists can have your air conditioning taken care of and back when driving with item of mind.
Rv Plumbing Repair Near Me La Habra, CA

To make an appointment please call one of our three convenient modern freeway pleasant locations (Rv Repair Places Near Me La Habra) or complete the e-contact form. Appliance Repair (cooktop, heating system, refrigerator, AIR CONDITIONING) Awning Fixing Axle Repair Service/ Upkeep Flooring Repair Service Roof Repair Work Aftermarket Accessories Installment Electric Drawback/ Brake Setup Plumbing Gas Body Store/ Collision Center And so a lot extra
Little Supplier Little Prices additionally has Qualified Counter Personnel. Certifications: In Components we have Qualified Components Specialists and Certified Parts Supervisors. In Solution we have Certified RV Professionals, Master Licensed Technicians, Certified Solution Writers, and Qualified Service Managers, among which has been with Little Dealership since 1975. Little Dealership Little Prices recreational vehicle is a recognized participant of the Bbb with an A+ rating, the greatest offered.
We solution and fixing most major components including LP Gas, electric and plumbing elements. We are a totally certified and guaranteed repair work shop accepting insurance policy and service warranty claims. Come to the Northern Virginia RV professional. We utilize the very best high quality replacement parts to get you back on the road safely and in vogue.
Depend on our qualified service technicians to deal with any type of internal or exterior system. Camp Ground Mobile Home Park Dealership (Pre-purchase Assessment) On the Side of the Roadway Anywhere You Might Be Within Our Service Area is one more of our specializeds.
Motorhome Repair Near Me La Habra, CA
Our objective is to use the best Recreational vehicle services offered at affordable prices. Pleased to announce we now offer RV sales & consignment.
I will use RV Fixing Bear once again. They took the RV right in and serviced every little thing while I waited as assured.
Motorhome Service And Repair Near Me La Habra, CA
I will definitely be back for maintenance in the future. Not just did they make time within 48 hours to look at it and diagnose it, turns out they had the old board in supply! Taken care of in 4 hours.
Rv Generator Repair La Habra, CARv Service And Repair Near Me La Habra, CA
Rv Solar Panel Installation La Habra, CA
Motorhome Repair Shop La Habra, CA
Rv Delamination Repair Near Me La Habra, CA
Motorhome Repair Service La Habra, CA
Rv Repair And Service Near Me La Habra, CA
Motorhome Generator Repair Near Me La Habra, CA
Motorhome Repair Shop La Habra, CA
Motorhome Repair Service La Habra, CA
Best Rv Repair Near Me La Habra, CA
Rv Repair Places Near Me La Habra, CA
Rv Solar Panel Installation La Habra, CA
Rv Delamination Repair Near Me La Habra, CA
Rv Plumbing Repair Near Me La Habra, CA
Rv Ceiling Repair La Habra, CA
Rv Plumbing Repair Near Me La Habra, CA
Motorhome Repair Near Me La Habra, CA
Best Rv Repair Near Me La Habra, CA
Rv Service And Repair Near Me La Habra, CA
Rv Mechanics Near Me La Habra, CA
Motorhome Refrigerator Repair La Habra, CA
Rv Ceiling Repair La Habra, CA
Motorhome Repair Shop La Habra, CA
Rv Repair In My Area La Habra, CA
Motorhome Repair Service La Habra, CA
Rv Repair Shops Near My Location La Habra, CA
Motorhome Repair Shops La Habra, CA
Rv Repair Shops Near My Location La Habra, CA
Motorhome Repair Near Me La Habra, CA
Rv Repair Services Near Me La Habra, CA
Rv Plumbing Repair Near Me La Habra, CA
Camper Ac Repair Near Me La Habra, CA
Rv Repair Places Near Me La Habra, CA
Rv Repairs Near Me La Habra, CA
Rv Solar Installation La Habra, CA
Rv Repairs Near Me La Habra, CA
Rv Repair Shops Near My Location La Habra, CA
Motorhome Repair Shop La Habra, CA
Rv Repair Services Near Me La Habra, CA
Motorhome Repair Near Me La Habra, CA
Rv Delamination Repair Near Me La Habra, CA
Rv Ceiling Repair La Habra, CA
Full Service Rv Repair Near Me La Habra, CA
Best Rv Repair Near Me La Habra, CA
Rv Service Repair Near Me La Habra, CA
Best Rv Repair Near Me La Habra, CA
Rv Repair Service Near Me La Habra, CA
Rv Repair In My Area La Habra, CA
Motorhome Repair Shop La Habra, CA
Rv Mechanics Near Me La Habra, CA
Motorhome Service And Repair Near Me La Habra, CA
Rv Ceiling Repair La Habra, CA
Motorhome Repair Shop La Habra, CA
Motorhome Refrigerator Repair La Habra, CA
Motorhome Repair Near Me La Habra, CA
Rv Repair Shops Near My Location La Habra, CA
Rv Floor Repair Near Me La Habra, CA
Rv Generator Repair La Habra, CA
Motorhome Generator Repair Near Me La Habra, CA
Rv Repair Service Near Me La Habra, CA
Rv Repair Service Near Me La Habra, CA
Motorhome Awning Repair La Habra, CA
Best Rv Repair Near Me La Habra, CA
Rv Mechanics Near Me La Habra, CA
Rv Refrigerator Repair Near Me La Habra, CA
Rv Generator Repair La Habra, CA
Rv Repair Shops Near My Location La Habra, CA
Motorhome Refrigerator Repair La Habra, CA
Rv Service Repair Near Me La Habra, CA
Rv Repair Services Near Me La Habra, CA
Rv Repair Shops Near My Location La Habra, CA
Rv Repair In My Area La Habra, CA
Rv Repair And Service Near Me La Habra, CA
Rv Repair Services Near Me La Habra, CA
Rv Repair And Service Near Me La Habra, CA
Rv Ceiling Repair La Habra, CA
Rv Solar Installation La Habra, CA
Find A Good Seo Package La Habra, CA
In My Area Seo Services For Small Business La Habra, CA
OCRV Center
Table of Contents
- – Rv Repair Places Near Me La Habra, CA
- – OCRV Center
- – Rv Repair In My Area La Habra, CA
- – Rv Generator Repair La Habra, CA
- – Motorhome Refrigerator Repair La Habra, CA
- – Rv Floor Repair Near Me La Habra, CA
- – Rv Plumbing Repair Near Me La Habra, CA
- – Camper Ac Repair Near Me La Habra, CA
- – Rv Refrigerator Repair Near Me La Habra, CA
- – Rv Repair In My Area La Habra, CA
- – Rv Repair Service Near Me La Habra, CA
- – Rv Solar Installation La Habra, CA
- – Rv Plumbing Repair Near Me La Habra, CA
- – Motorhome Repair Near Me La Habra, CA
- – Motorhome Service And Repair Near Me La Habr...
- – OCRV Center
Latest Posts
Plumber Repairs Near Me Mira Mesa
Residential Plumbing Companies Near Me Solana Beach
Local Plumber Sabre Springs San Diego
More
Latest Posts
Plumber Repairs Near Me Mira Mesa
Residential Plumbing Companies Near Me Solana Beach
Local Plumber Sabre Springs San Diego